
Guide: How to change the oil EA888 Gen3 2.0t engine with an oil extractor
Update 08/15/18: Topsider oil extractor broke and replaced it, more info here. New oil extractor significantly faster and suggested instead of Topsider.
This guide is for an oil change on the EA888 Gen3 engine using an oil extractor. For those who have not used an oil extractor, this is the cleanest, easiest way to change your oil. No need to jack up your car or even remove the drain plug in the oil pan. Instead you extract the oil directly from the bottom of the pan by sticking a tube down the dipstick hole and using suction to extract it all.
Tools/Supplies
- 6 quarts of VW approved 5w-40 synthetic oil
- oil filter /w rubber ring 06L-115-562
- 32mm socket (for oil filter housing)
- oil extractor that can hold 6.5+qts and have thin tube
- Optional: funnel
- Optional: Needle nose pliers for the o-ring on the filter housing
First, read over the instructions on your oil extractor. I am using the TopSider in this guide and do suggest it if you are in the market for one. You may need to modify some of the guide if you are using a different one.

- Make sure your engine is not really hot, it could melt the tube. It’s ok and actually good for it to be a little warm but if you just parked it wait 30 minutes. If it’s cold, run the engine for 2-3 minutes to warm up the oil before continuing. Warm (not hot!) oil works best.
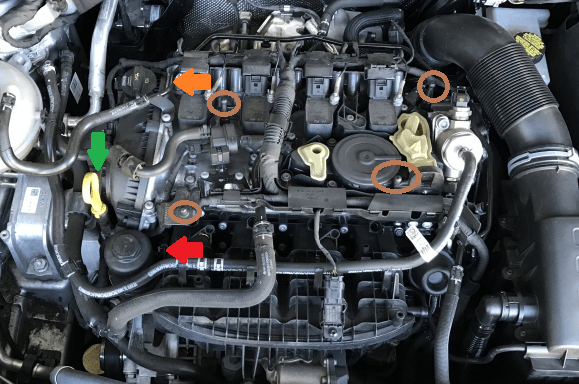
- Take out your dipstick and put it to the side. This has the yellow pull handle below the green arrow in the picture above.
- Put the oil extractor hose down the dipstick tube until you feel it hit the bottom of the pan, the go a little more till it hits the side of the pan. This should be an addition 3-5 inches from the bottom.
- Pinch off the hose with the white clip on the tube.
- Pump the oil extractor for 35ish times.
- Take off the oil cap. This is to the left of the orange arrow in the top picture.
- Release the white plastic clip on the hose. You should see the oil start being sucked out. This will take 8-20 minutes depending on how warm the oil is.
- Let it be until you hear bubbles gurgling, this means the mostly done. Pull the tube up and down a few inches to suck up the last of the oil.
- Once suction is gone remove the tube completely from the dipstick hole.
- Put the dipstick back in.
- Take off the engine cover, put your hands on the left and right sides of the cover and rock it back and forth. There are four posts on the underside you are trying to loosen it from. These posts are shown in the top picture circled in brown.
- Use the 32mm socket to remove the oil filter housing. Counter clockwise loosens it. The filter housing is to the left of the red arrow in the picture at the top.
- Pull out the filter from the filter housing and remove the rubber o-ring at the bottom of the threads. Needle nose pliers help with getting the o-ring off.
- Replace the filter and o-ring, lube the ring with the excess oil so it forms a good seal
- Torque down the oil filter housing to 25-30ft lbs. Don’t over tighten, its just plastic!
- Use the funnel to fill the engine through the oil cap hole. This is left of the orange arrow in the picture at the top.
- Put in 5 and a half quarts of oil in and put the oil cap back on
- Run the engine for a minute just to move the oil around inside then turn it off.
- Remove the dipstick, wipe it off, put it back in then remove it again. The oil should be at the top end id the hash marks, fill and repeat engine cycle until it is at the top end of the hash marks. Typically it takes 5.75 quarts for me to get near the top of the hash marks.


Thats it! Now go give it a test driver and check for leaks after around the dipstick, oil cap and filter housing.